by Kevin OBrien on 03/09/2012
HOW DO I RIP CD AND DVD-A TO LOSSLESS FORMAT?
I decided to write an F.A.Q. on how to rip one's CD collection. I will briefly touch on DVD-Audio ripping into Hi-Res files as well. Unfortunately, I have not figured out how to rip SACD's. The one exception is the CD layer within Hybrid SACD's. This is the same process as ripping a CD. Although not all SACDs are of the Hybrid variety.
I prefer to use EAC for CD ripping. I've heard around the campfire that Foobar 2000 has a ripping suite that bests any other program as far as sound quality is concerned. I will touch on that after I describe the CD ripping process within EAC.
EAC is very easy to use, it's FREE, and it does a GREAT job of ripping CDs. Where it really shines is ripping dirty or scratched CDs. It may take several hours but it should be able to rip them accurately. It won't rip EVERY scratched CD, but should rip most of them if they're not scratched too badly. This is the MAIN reason I use EAC over any other CD ripping suite!
Install the program by executing the install file after downloading here. Once the program is installed, place a CD into your CD Rom drive. EAC will ask you if you want to perform a test on your CD Rom drive. You can let it test your drive or use the documented settings. I always let EAC test my drive for the most accurate results. Below I've attached a screenshot of the EAC menu where we must begin with our set-up.
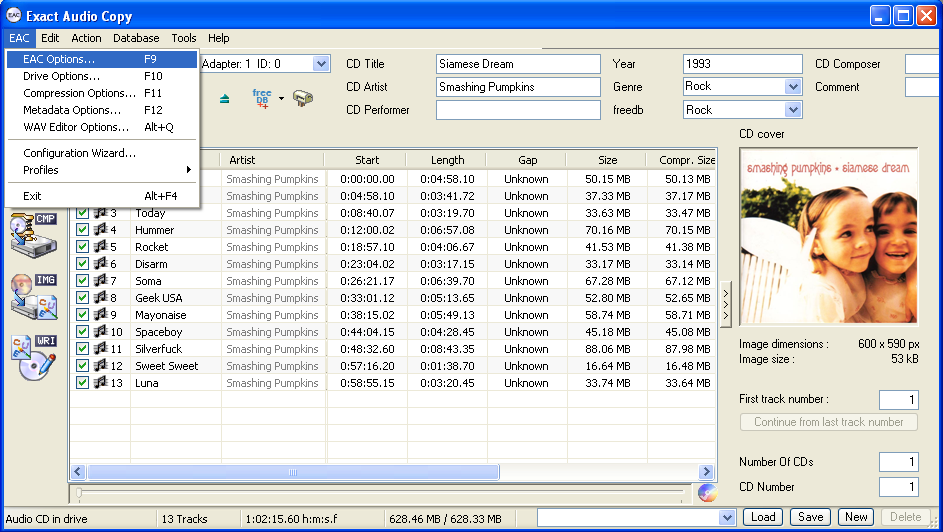
First, let's set up our options correctly. You will have to drag your mouse over the EAC menu in the upper left hand corner of the EAC program window. Once you click on that heading, you will select the EAC Options heading. The screenshots below will show you the options we will change.
Click on the Extraction tab. You need to set the "Extraction and compression priority" to 'High'. You also need to set the "Error recovery quality" to 'High'. They are set by default at 'Normal' and 'Medium' respectively.

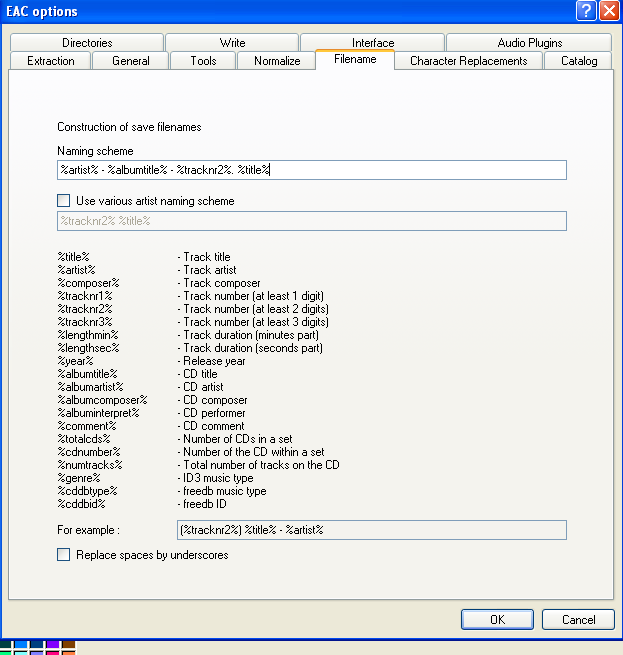
Now click on the Filename tab. This is where you get to decide how your files are tagged. This will dictate how your digital player (JRiver in our case) will display your files in your playlist. You have to copy the exact naming scheme on the left hand side column to achieve what is shown in the right hand side column. If your files aren't getting tagged correctly this is the tab you need to click on to change your settings.
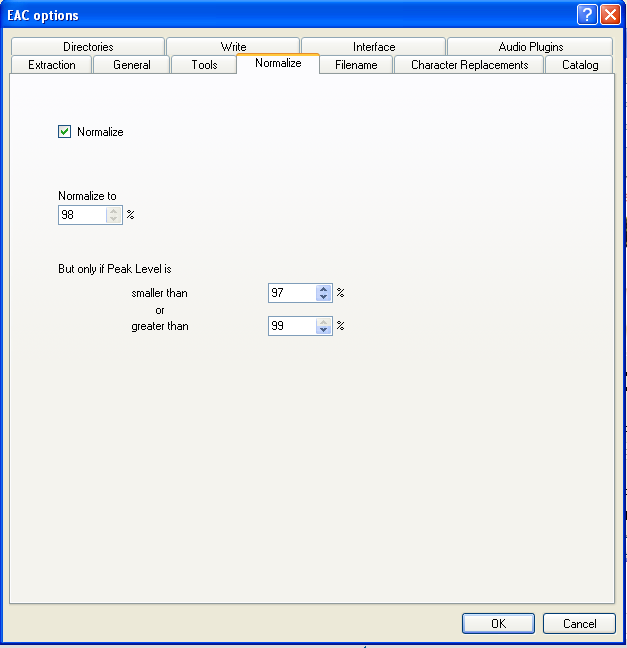
Let's click on the Normalize tab next. Here you can decide if you want to make all your files the same volume or leave them at the studio recorded levels. I like to avoid normalizing my tracks unless there's a good reason to do so. I like to keep the files at the same volume they were originally recorded at to preserve the artist's work and this way I don't alter them.
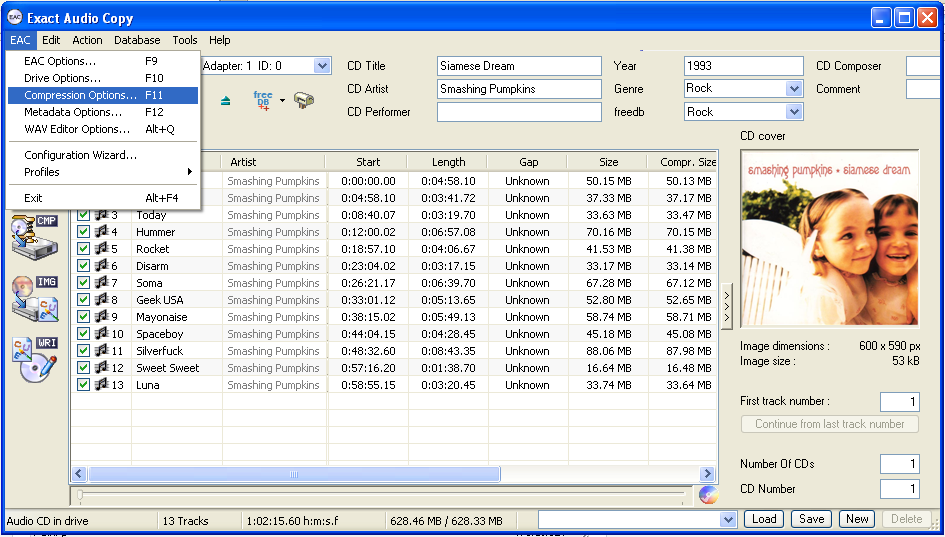
Now we need to go back to the EAC menu and select the Compression Options heading. This is where you select what format you want your ripped files encoded to (WAV or FLAC).
I prefer to output my files in the WAV format as there is NO COMPRESSION in this format. FLAC is another option but the files will be slightly compressed. The compression is lossless so you can get the information back if you need to down the road. I just choose to stick with WAV so I don't have to worry about it. Hard disc space is cheap these days!
Now click on the Waveform tab. I am showing you how to select the WAV output format. You can choose FLAC as an output option as well. Select the options that I have in the screenshot below to output 16/44.1 stereo WAV files.

Once you've chosen your output format you need to go to the Metadata Options heading as shown below.
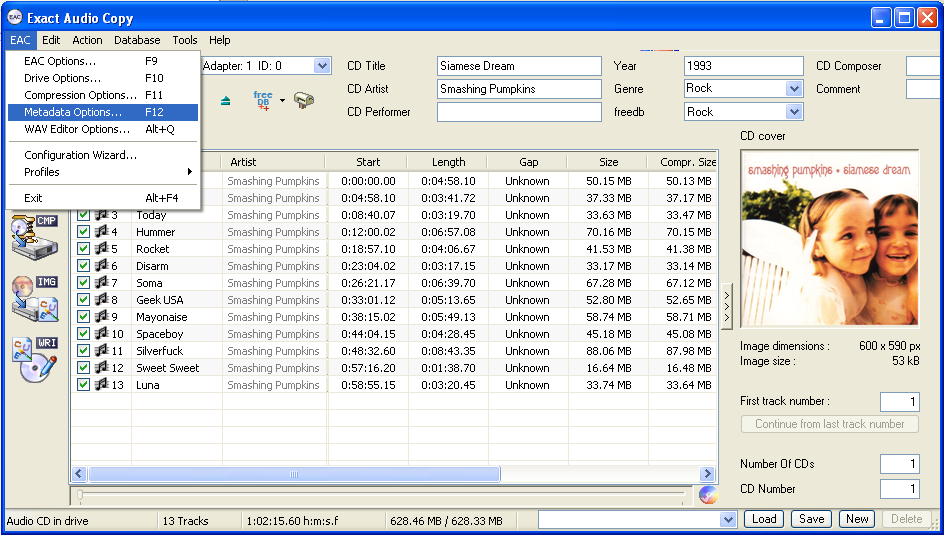
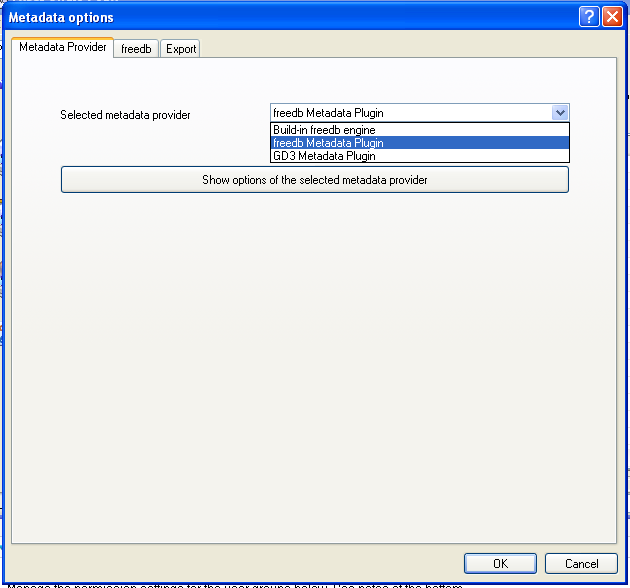
From here you will select the Metadata Provider tab. Choose the "freedb Metadata Plugin" option to allow your CD's track and title information to be automatically completed for you within the EAC program. When you are back in the main program window hit the 'freedb' button in between the 'Eject' button and the 'Mailbox' button. This is how you get freedb to find your specific CD in its database. Make sure to check the freedb information that is automatically input and feel free to change any mistakes. There are mistakes every now and again so check the info! Also, the information in the "CD Title", "CD Artist", "CD Composer", etc. boxes in the upper right hand portion of the program window will show up in your file names/ tags. Change these headings to whatever you prefer or leave them as-is.
After EAC checks for track and title information it will automatically ask you if you'd like to search for album art. I go ahead and perform the search and then I decline to search for CD lyrics in the next step. That is up to you.
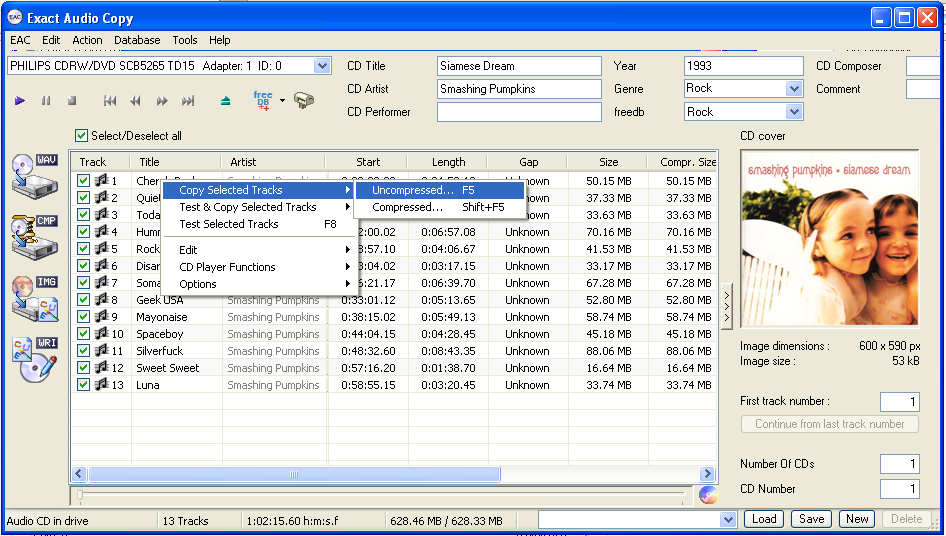
Now that you're all ready to go let's rip the CD! Check the boxes next to the tracks you want to rip. This allows you to skip that track you never listen to, etc. Right-click on one of the tracks (any track will do) and select "Copy Selected Tracks" and then select "Uncompressed". EAC will then ask you where you want to save your files. Point the program to your desired location on your hard drive and then watch EAC rip your files!

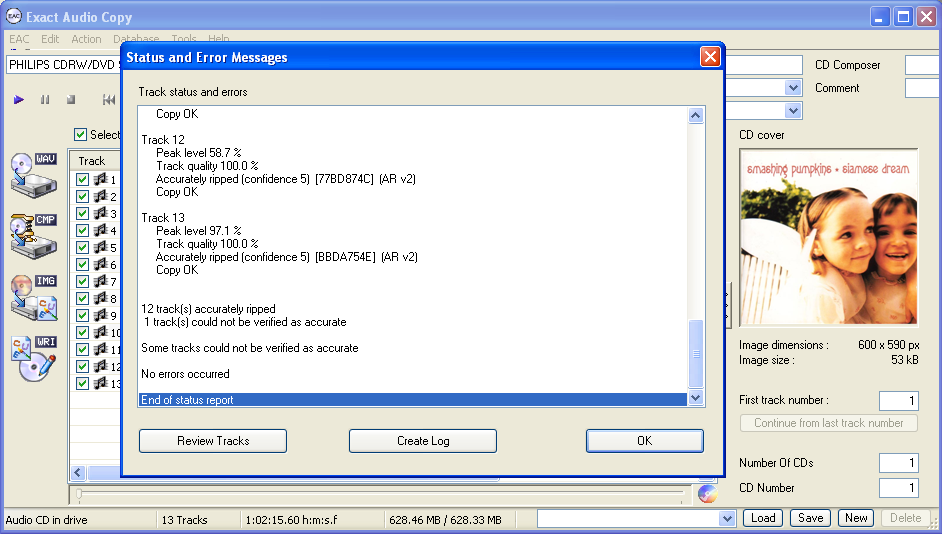
When EAC is finished ripping your CD it will show you a report of what happened during the rip. It shows the levels for each track, track quality, if there were any errors during the rip, and where in the song ("suspicious position") the error likely occurred. VERY NICE!
Now you are an EAC CD ripping pro! It's that easy.
------------------------------------------------------------------------------------------------------------------------------------------------------------------------------------------------------------------------------------------------
Now we will look at ripping with Foobar 2000. It's actually a little easier than using EAC since there are a few less steps to set the program up. Overall, I feel they are about the same in terms of user-friendliness once you have the initial set-up configured. The only downfall I see with Foobar is the fact that you have to manually input track information if it doesn't automatically come up and there's no error report after you're done.
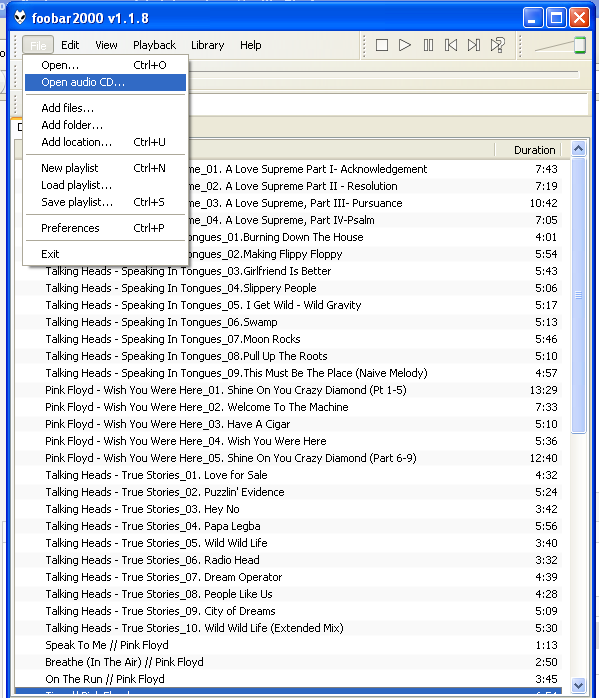
Download the Foobar 2000 program here. Click on the executable file to install the program. Once installed, place your CD in your CD Rom drive to begin. Click on the File menu at the upper left hand corner of the Foobar program window. Now select the "Open audio CD" heading.
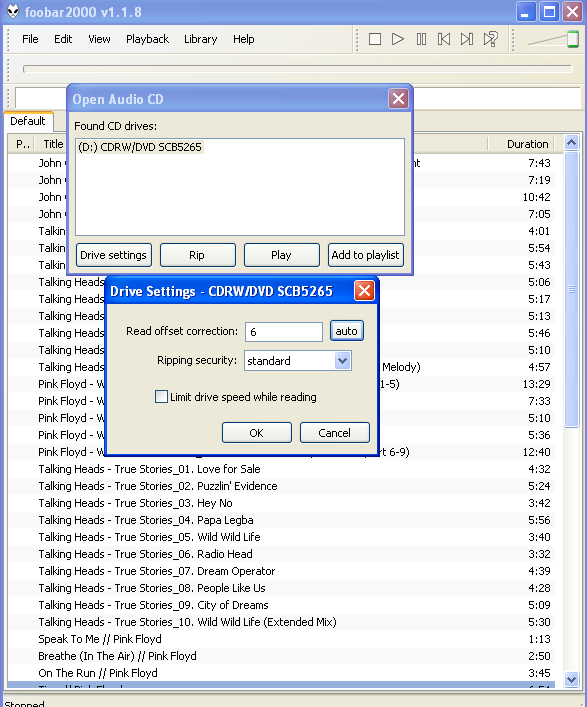
Now you need to click on the "Drive Settings" button on the "Open Audio CD" window and the "Drive Settings" window should appear. In order to get the correct CD Rom drive settings, you must click on the "auto" button adjacent to the "Read offset correction" heading. My drive setting was automatically set to 6 after hitting the "auto" button. Now set the "Ripping security" to "standard". Press the "OK" button and you will be taken to the "Rip Audio CD" window.
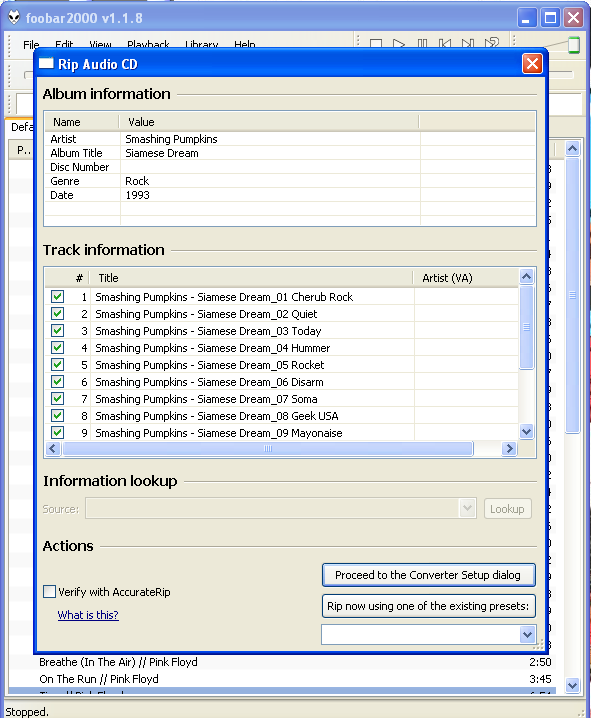
This is where the user has to manually enter the CD data within the "Rip Audio CD" window. I'm sure there's a way to get the info automatically but I didn't bother figuring it out. There's most likely a downloadable plug-in to enable the freedb database or something along those lines. Pay attention to your naming scheme here. Don't just type in the name of the track. Input the full file name you want to see in your playlist BEFORE you move on to the next steps. Don't forget to enter the album information at the top of the window as well.
It's time to tell Foobar what output format you want for your files to be encoded to (WAV or FLAC). The default output format is set to WAV. I haven't played around with how to get to a different output format for my files but I'm sure it's not too difficult. (I assume you click on the "Output format" link and you can set it up there) If everything looks good, it's time to hit the "Convert" button and start ripping! 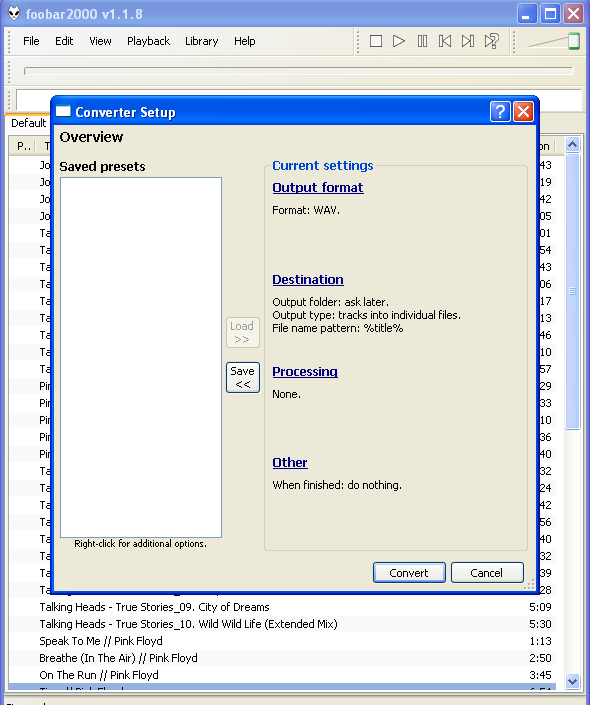
Foobar will ask you where you want to save your ripped files after you hit the "Convert" button. Point Foobar to your destination folder and then hit "OK".

Now the ripping progress window should pop up to show you where you're at in the ripping process.

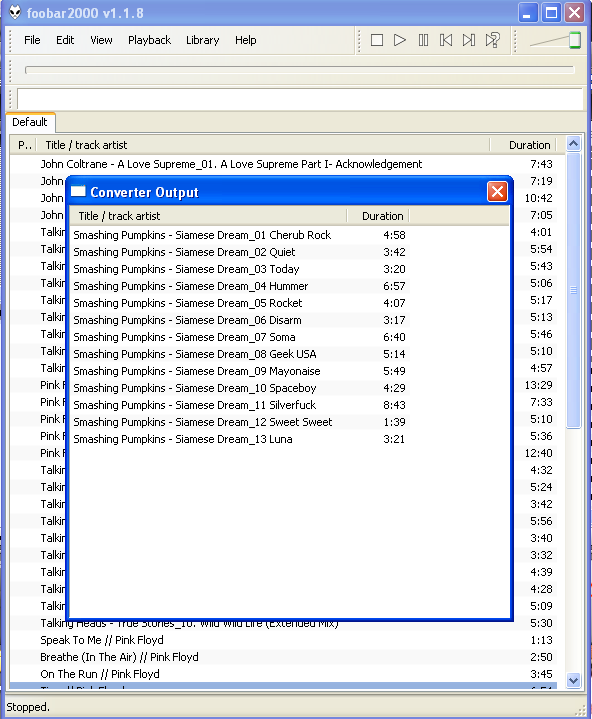
You're almost done. When the rip finishes, the "Converter Output" window will pop up and show you your file names and their duration. Unfortunately, there's no error report, track quality assessment, or suspicious position report either. That's a bummer but what are you going to do?
I still feel EAC wins in the ripping software department due to the error reports and the freedb database access. Scratched and dirty CDs will be easier to "keep an eye on" due to the suspicious position report in EAC as well. Se la vi!
--------------------------------------------------------------------------------------------------------------------------------------------------------------------------------------------------------------------------------------------------------------------------------------------
Now I will briefly talk about the DVD-Audio/ HDAD/ DAD/ Dual Disc ripping software that's available. I love the idea of a "Digital Audio Disc" or any type of Hi-Res disc. What a great idea. I'm a little upset with Sony as none of the SACD titles seem to be available for download on HDTracks or anywhere else for that matter. Something tells me it has to do with money.
I'll get over it hopefully some time down the road. Maybe that time will come only after 'Kind of Blue' and 'Time Out' are released in 24/96 or 24/192 FLACs. I know, I should just keep dreaming!
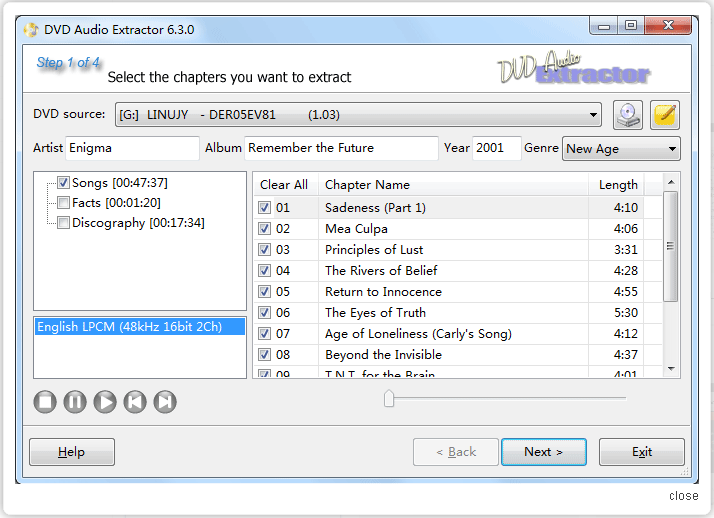
One software suite available to rip these Hi-Res discs costs just under $35. The software is called DVD Audio Extractor. There is a free DVD-A ripping suite called DVD Audio Explorer. I have experience with neither program. It looks like the program you have to pay for is the easier one to use. Go figure! My goal here is to introduce folks to the concept of ripping their Hi-Res discs instead of having to pay for Hi-Res downloads. If you have a decent collection of DVD-Audio discs, this is a worthwhile investment.
I have enclosed a few screenshots of the DVD Audio Extractor for your reference.

Now that you've been exposed to these various optical disc ripping software suites, there's no excuse to not be able to rip anything but a SACD. Go rip your heart out folks!
THANKS for reading!
-YFS Design Team