Music Server Playback Software Suites

by Kevin OBrien on 02/14/2017

JPLAY 6.2 SOFTWARE REVIEW

I want to personally thank Marcin from JPLAY for being so generous and turning us onto this game-changing software.

It took me a while to find the time to give JPlay a shot. About almost 2 years to be exact. But here I am and I'm writing this article to tell as many readers as I can that JPlay is the real deal. There is no need for debate on this topic any longer. All of us here at YFS start with theory and end with our ears. That's the ultimate test: what sounds best to us at the end of the day.

JPlay has transformed my system into something I could never have imagined. If you cannot hear the difference between JPlay's basic stripped down JPLAYmini stand-alone player and your current software for Windows, there's a problem with your system. It's that simple.

I've never heard my music the way it sounds with JPLAYmini. There's added dimensionality, more life-like sound, and I am hearing things I never noticed before in my favorite albums. It feels like I have unleashed a newly upgraded system with updated fully burned-in gear. The reality is the only change in my system is my choice of playback software. To me, that speaks loudly enough for me to recommend JPLAY to all my customers using Windows-based servers.

Album Player was our go-to software up until now. I still love Album Player but it sounds boring now compared to JPLAY's suite. JRiver is great for users who want to see their artwork and tag their files. If you want a very neat and tidy way to get ALL of your music in front of you with album art, artist and album names, JRiver is the suite of choice. If you want the best possible sound from your dedicated Windows-based music server, JPLAY has no competition.

Marcin gave me a few hints as to which specific settings should be used to get the best possible sound quality out of my YFS Ref-3 server. Kernel Streaming (Ultra Stream) with a PC Buffer set to 10 seconds along with the DAC Link set to 1 Hz seems to be the preferred way to set up JPLAYmini. This comes directly from the manufacturer. See the JPLAY settings window above for reference (values are not set correctly above but are shown to give end users an idea of where specific settings are located within the pop-up window). If settings are not compatible with your hardware, JPLAYmini may give you an error. It may just play your tracks and you'll get no sound from your speakers. That is how things worked for me. Until I aligned the settings correctly with my hardware, I could not switch back and forth between all formats (DSD64 and DSD128 along with PCM 24.192 files) without spitting out errors in the JPLAYmini window.

Sound quality is the utmost important factor for us when deciding on gear and this comparison between suites was no different. For 100 Euros, I cannot think of money better spent. Most of my audiophile investments cost much more and give me much smaller gains for my money.

Give JPlay a shot. Use it as a stand-alone product and you will be kindly rewarded for your efforts.  I guarantee it.

 - YFS Review Team

 Associated Equipment for this Review:

  • YFS Computer Music Server - HD-Ref-3
  • EMM Labs DA2 DSD DAC
  • McIntosh C2300 Preamp with Siemens NOS Tubes
  • McIntosh MC202 Monoblocks (1 Pair)
  • Von Schweikert Unifield II Mk3 Speakers
  • YFS Custom Room Treatment
  • YFS Custom Interconnects and Cables


JRIVER MEDIA CENTER 17 COMPUTER AUDIOPHILE SOFTWARE REVIEW

We know most folks in the audiophile world are afraid of drastic change and have adhered to the general audio source rules for a while now. We used to adhere to the same rules as well. A few of them are: "Computers are not good audio sources and do not sound as good as CD transports for digital." or "I listen to vinyl so why would I bother with a computer for an audio source?" or "Digital files are compressed and lossy such as MP3's and AAC files. Why would I play those types of files on my $100,000 system?" etc. I think I've heard them all and I used to say the same things until very recently. We here at YFS understand the stigma involved with using a computer in your audiophile system. It does seem scary and the software can become a nightmare to install especially if it's your first try. That is why we are writing this review. We want the folks who have been on the fence about computer audio to finally make the jump and come into the new digital age as painlessly as possible.

We would like to provide our readers some details and insight into the computer audio software that we have recently tried out called JRiver. We were using the FREE software package called Foobar 2000 for a while now with great results. Did we mention it's FREE? Hence our main reason for using it. We have been aware of the JRiver Media Center software suite for a while now but the idea of paying $50 for software when we could get another great program for free has always been a turn-off. It does pay to keep an open mind though as I'm finding out. When we were setting up our computer vs. CD transport reviews we had trouble getting the original Musical Fidelity V-DAC to accept a bit-perfect digital signal via USB so we decided to give JRiver a try. We're glad we did. Unfortunately, we have experience with PC's and we do not cover a solution for a Mac. We apologize as we know there are a considerable amount of Apple users out there. Amarra may be your software of choice if you use i-tunes although it's MUCH more expensive than JRiver.

This process is valid for USB to SPDIF converters as well as USB DAC's. Whether your converter or DAC has an Asynchronous USB input is important as well. The original MF V-DAC does not have an Asynchronous USB input. Most USB DACs on the market nowadays have Asynchrounous USB inputs so this should not be an issue for most users anymore.

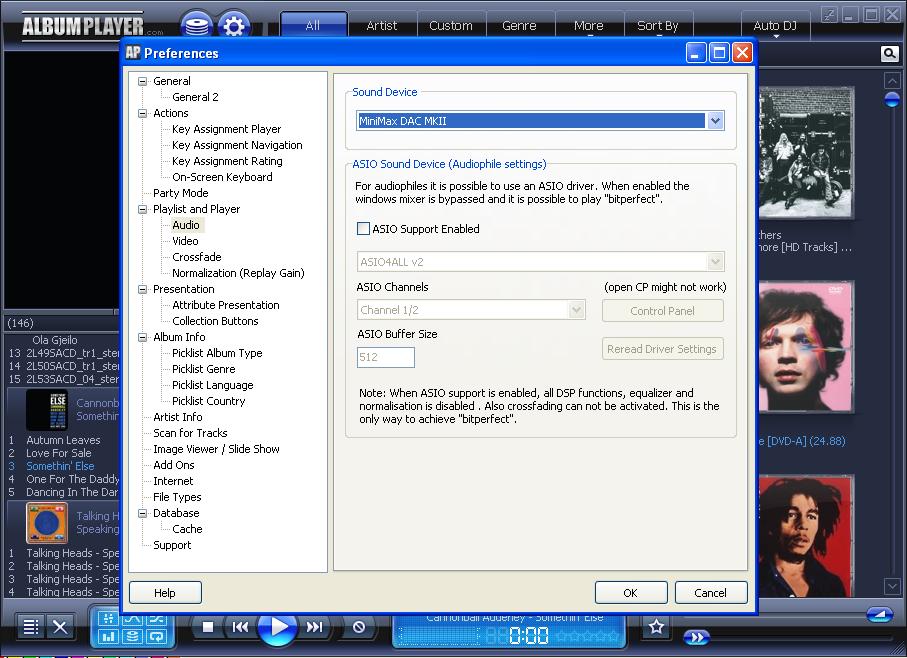
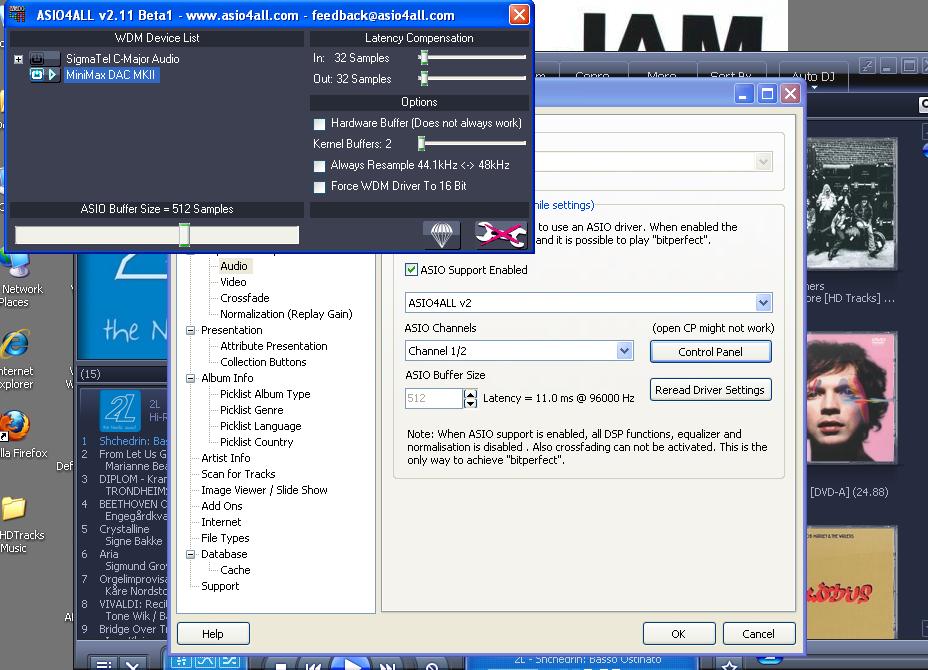
As it turns out, JRiver provides the end user with many more options than Foobar, all embedded WITHIN the program. You can get to the same end-point with Foobar but it can take more time and the user must be fairly comfortable with installing and tweaking computer software. For instance, if you want to try WASAPI or ASIO you must download the corresponding Foobar plug-in and then install it within the Foobar program. This can be a problem for many users who have a hard enough time installing the main program let alone all the extras. Below you will find a step-by-step process to walk you through a typical JRiver Ver. 17 installation. The only change for your personal system will be the type of drivers you will install for the specific DAC you are using. These drivers should be downloadable from your DAC manufacturer's website or they should be enclosed on a CD-ROM with your DAC along with the rest of the accessories. (Your device may be driver-less. Such is the case with Musical Fidelity USB DAC's) We will assume here the user is running Windows 7 on their PC. If Windows XP is your software of choice, the Kernel Streaming plug-in or the ASIO plug-in for Foobar 2000 may be your only option for bit-perfect digital playback as the WASAPI plugin for Foobar is not supported in XP! WASAPI bit-perfect output is only supported in Windows Vista and Windows 7. We have not tried JRiver Version 17 in XP but I assume it works well. Another option for bit-perfect playback in XP could be the ASIO4ALL program in conjunction with Foobar 2000. Make sure to give this software a try! It matches the resolution of your digital files to your DAC resolution for maximum and optimal compatibility, all on it's own. We have had success with it running in Windows 7 in conjunction with 'another program' we're going to share with you in the near future.  

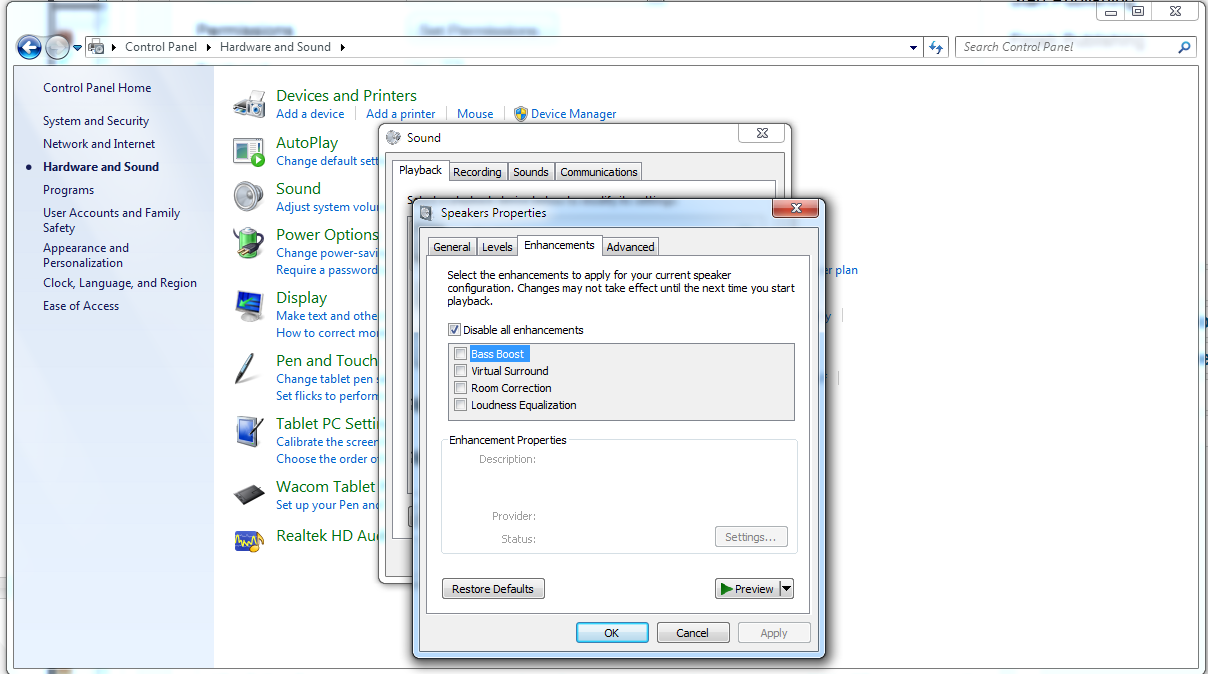
First, let's make sure we're in "Exclusive Mode" and have the Windows Sound Enhancements turned off. The user must enter the following path to get to the adjustments: 'Control Panel' -> 'Hardware and Sound' -> 'Sound'.  Make sure your proper USB Sound Device is set to default.                                                                                                                                                                                                       

Once you know you have the correct device enabled, hit the 'Properties' button in the bottom right-hand corner of the current window.

Make sure you have BOTH boxes checked under the 'Exclusive Mode' heading on the 'Advanced' tab.

Make sure you disable the Sound Enhancements as well on the 'Enhancements' tab.


Now, let's talk about what all these terms above mean. The user can usually install the proprietary drivers from their DAC manufacturer, install the JRiver software, select their device within JRiver, and be on their way. Unfortunately, most of the time this involves using the default output mode called direct sound.

All of the features we are about to describe are accessed by pressing "Ctl+O" to get to the "Options" main menu. Make sure you select the correct device under the "Output mode settings" heading under the "Audio Output" menu. Here the user can also change the output buffer size depending on the performance of his or her machine. You may have to play around with this a little to get it right where it needs to be.                                                                                                          

Let's get back to our "direct sound" description. This option sends your music stream to your DAC but it gets Windows involved during the process. This is not desirable for audiophile playback as it does not allow the music stream to go unaltered to your DAC. To solve this problem, the user must enable the WASAPI output or ASIO output option under the "Audio" menu. Go to the first available heading under "Audio" named "Audio Output". The user will see an option called "Output mode:".  Set the output mode to WASAPI or ASIO.  IT IS SET TO "DIRECT SOUND" BY DEFAULT.  Not all devices support ASIO but WASAPI should work for almost all devices. Just remember, ASIO is the preferred configuration if at all possible! Either  of these configurations as well as Kernel Streaming allows the user to achieve a bit-perfect digital signal out of their computer into their USB device just like a CD transport sends its digital signal to a DAC.                                                                                                                                                                                                                                                           

If you're using an advanced music server that has a dual-core processor and 8 GB of RAM and want to take advantage of your hardware, you can tell JRiver to play your digital files in 'Memory Mode' for even better performance. This is done by checking the "Play files from memory instead of disk" box under the "Settings" heading under the "Audio" menu. This should improve your performance if your computer can handle it.

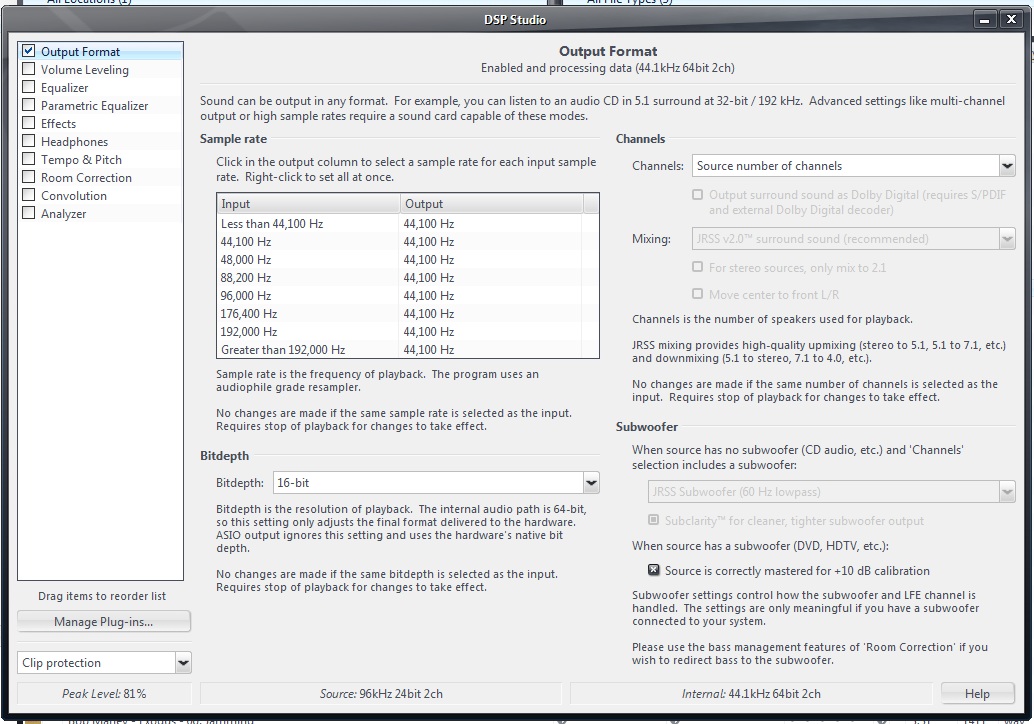
The next step would be to choose the output format you would like your digital files to be output in. We are talking in terms of bit-depth and sample rate. What I mean is, it's time to tell JRiver you want to play all your files upsampled to 24/96 even though your source files may be 16/44 or vice versa. This is one very nice feature that I have not been able to find in Foobar. You CAN change the bit-depth parameter in Foobar but not the sampling rate as far as I can tell. You can even tell JRiver to downsample your 24/192 files to 24/96. This is especially useful if your DAC only supports 24/96 files. This is accomplished by going into the heading "DSP & output format" under the "Settings" heading and telling the program to output in either 8, 16, 24, 32, or 64 bits. We were able to get up to 32 bits working but not 64. To change the sample rate of your files you need to go into the "DSP & output format" menu under the "Settings" heading and click on the associated table. Each sample rate can be set to stay the same or change to whatever sample rate you prefer depending on the incoming sample rate JRiver sees from your source files. Very slick!

With this scenario above we were able to get "WASAPI Event Style" to work. We matched our native  resolution of our V-DAC to the output resolution in JRiver. If you try and push your server/ DAC combo  beyond it's capabilities, your computer may crash as we experienced. Only now we were able to get bit-perfect digital output from our server via USB to our Musical Fidelity V-DAC MkI!  

There are a plethora of various other options the user can toggle through at his or her leisure. There's even a "Room Correction" feature as well as "Volume Leveling" and many others. We have not bothered to adjust any of these other parameters as we have tried to keep the outgoing signal as free from DSP effects as possible. Play around as you see fit.

We would like to mention that WAV files can be ripped using Foobar or EAC which preserves all of the quality in the original CD. You do NOT have to accept or put up with lossy formats such as MP3, WMA, and i-tunes AAC files in this day and age. Just don't do it! 

One thing we did notice that should interest computer audiophiles is that there is a noticeable difference in sound between Foobar and JRiver. To me, JRiver sounds a bit warmer and Foobar gives you more of that "in your face" sound. Try them both to see which you prefer. You've got options here folks which is great!

I hope this review has enlightened you as well as provided some valuable information. We really hope you try the various software suites we have touched upon, especially JRiver. I'm sure there are a few more software playback suites available and it's only a matter of time until we get to try them and report back. Hopefully this will help our readers with their installs and if there are any questions out there, don't hesitate to e-mail us and we'll get back to you as soon as we can.

ENJOY!

- KOB, BJE

Associated Equipment for this Review:

  • YFS/ SCH Custom Speakers
  • YFS Custom Room Treatment
  • Musical Fidelity V-DAC
  • YFS Custom CA-60a Preamp and Custom 6L6 Tube Power Amp
  • YFS Custom Interconnects and Cables


by Kevin OBrien and Brad Easton on 03/27/2012

ALBUM PLAYER V5.3 SOFTWARE SUITE REVIEW

We would like to give some props to our favorite digital files playback suite called Album Player. We have touched on JRiver as well as Foobar 2000 but we haven't discussed an alternative suite yet. Sure, JRiver has an option to buffer your files to your server's memory before playback but does it really do the best job at this? By the end of this review, you'll know the answer to that question. We are assuming the user will be implementing Windows XP or Windows 7. We will not be covering any other OS in this review.

We stumbled upon two players a short while ago called JPlay and Album Player. We were pretty excited about JPlay at first and then we realized Album Player is just plain better in terms of user friendliness.  JPlay is the better player for that no frills, (no GUI) top-notch computer source playback. Although when we are done here, you may find Album Player is the playback software of choice for the foreseeable future just like we did.

Technically speaking, JPlay is not a digital files player by itself. It integrates within Foobar 2K or JRiver to accomplish its tasks (plug-in). Album Player is a totally separate, stand-alone player that does not integrate within another player. It's important to make this clear for potential customers of either suite. JPlay costs 99 Euros and Album Player will set the user back just under 30 Euros. That's quite a difference in cost!

Let's begin with the difference between JPlay and Album Player v5.3. AP is available to install as a mouse and keyboard suite or the user can decide to install it as a touch screen suite. VERY COOL!  JPlay has even better performance than AP by allowing background OS tasks to be shut down completely and therefore use less of your server's resources during playback. This is only true in the case where the user is using a laptop instead of a more powerful dedicated music server. If the user is able to implement a dedicated music server that is on the cutting edge technology-wise, the AP suite will perform just as well as JPlay but give the user a more friendly user interface.

The other reason we like AP more than JPlay is that AP is the easiest playback suite to set up that we have come across to date! Check out the screen shot below to adjust the 'Audio' settings within AP. There's only one or two options to choose from.

The user must hit the "sprocket" or "gear" button directly above the "N'" in "SOMETHIN' ELSE" in the screen shot below. This allows the user to enter the "Preferences Menu". The "stack of discs" button next to the "Preferences Menu" button points the user into the "Database Menu" where you can add your digital files and edit them. Make sure to use the "Collection Editor" within the "Database Menu" to delete albums from the AP database after you delete them from your hard disc. The "Database Menu" is somewhat tricky to use at first but it becomes easier as you continue to use it. 

Now hit the "Preferences" button about half-way down the screen shot above. The user will now set up the software for his or her specific DAC. Make sure you have installed your DAC's drivers and that your DAC can 'talk' with your server before you start AP. Also make sure the DAC is turned on before starting the AP application. If not, the DAC will not be selected as the 'Sound Device' and sound will most likely be output via your computer speakers. Select your device (aka your DAC) under the "Sound Device" heading. One important note here. It shows in the screen shot below that checking the ASIO box is the only bit-perfect scenario within AP. You must check that box and have ASIO4ALL installed on your computer. We were able to get the ASIO option to work with the Minimax DAC Plus after we installed its driver from the Eastern Electric website. ASIO is the ONLY way to get bit-perfect playback via Album Player!  We spoke with Peter van der Burg, the AP software designer, and he confirmed with us that the ASIO option is the only bit-perfect playback scenario within AP. 

Now you need to make sure you select the correct WDM device so ASIO4ALL knows which device to use. Hit the "Control Panel" button within the "Preferences Menu" under the "Audio" heading after checking the "ASIO Support Enabled" box.  The screen shot below shows the user how to select the proper audio device within ASIO4ALL. Double-click the correct device so the "on/off" switch is lit up next to the "play" button and you should be ready to begin playing files! The user can also change various playback settings in the same "Preferences Menu" window by going into the other options such as "Crossfade" and "Normalization".  We prefer our tracks to play gapless and we turn Replay Gain off (Normalization).                                                                                                                                                               

Once we were able to get AP and JPlay set up properly, we compared the two playback scenarios and we could not tell a difference between them. If there was a difference between JPlay and Album Player, it was ever so slight. The important thing to note here is that many folks will not be able to tell a difference between JRiver/ Foobar 2K and Album Player/ JPlay if they are simply using a laptop as their music server. In this case JPlay may be the best option as it turns off all background applications while playing your files.

We did notice a difference while using our YFS HD-Ref-1 server. AP/ JPlay definitely was a step up in sound quality over Foobar/ JRiver in our system. Your mileage may vary.

Another very cool aspect of Album Player was the way it handled playback among our laptops that we have used in the past. We had plenty of trouble trying to set up laptops with our various USB DAC's. We kept getting random audio drop-outs as well as other issues. When we tried Album Player on the same laptops, they played seamlessly without ANY issues. The drop-outs occurred for the first few minutes and then AP "learned" how to adapt to it's environment and the drop-outs went away EVERY time after a short while and lasted through our entire listening session. This was true for EVERY file resolution we tried including 24.192. This aspect alone was a huge selling point to us.

Hopefully we've opened some users' eyes to some new software suites for digital playback. That was our goal here. Give these software suites a try and keep an open mind and keep your CD transport turned OFF!!!

THANKS for reading!

 -KOB, BJE


Associated Equipment for this Review:

  • YFS Computer Music Server - HD-Ref-1
  • Eastern Electric Minimax DAC Plus
  • Quicksilver Audio 12AX7 Preamp
  • McIntosh MC275 Tubed Power Amp
  • Von Schweikert VR-5 HSE Speakers
  • YFS Custom Room Treatment
  • YFS Custom Interconnects and Cables
  • Herbie's Audio Lab Dampening Products


Connect with us today!